4.11.2013

Craft Time in the Kitchen

It took me awhile (mostly out of procrastination and busyness not complication) but I finally made curtains for the kitchen! The goal was to match fabric I already owned with the paint colors of our spice closet and back door. That wasn't too hard because I have a lot of fabric. I ended up using a flat bed sheet that I bought a long time ago because it had bright colors and a cute flower pattern. It was easy to use this type of material because it already had a built in tube for the curtain rod. I just added some extra blue accent fabric and it was perfect. I modified the pattern Katie used for the valance in her kitchen. Just another way our houses are twins.


2.16.2013

Chickens! Part 3: Nesting Boxes & Roof

More photos of chicken coop construction. The third side includes a window and the nesting boxes. We also tried to make the roof as water-proof as possible so our little ladies don't get too wet in winter.

Overhead view of construction--the coop is going to go back near the yellow tub.

Katie and David work on the third side.

Fitting the nesting box.

Katie and Abbey designed the nesting box.

The roof in progress.

The third side with window before adding the nesting boxes.

Where are the eggs?

2.13.2013

Chickens! Part 2: Initial Sides

After we visited six chickens keeping friends, we sat down to determine what features we liked the best and wanted incorporate into our coop. We used many books including our favorite which ended up being Art of the Chicken Coop by  Chris Gleason. It included actual construction plans and a lot of pictures. One key aspect was to be able to collect eggs without having to enter the coop or run. We wanted to put the coop at the stretch of ground at the end of the driveway, so the nesting boxes needed to be on the driveway side of the coop. We also wanted to be able to keep the coop open at all times so the chickens can go in and out at will (and no one would have to wake up early every day to let them out). Yet they need to be protected, so the run would have to be completely enclosed.

We are trying to build the coop out of mostly reclaimed materials. Patrick did most of the collecting from Craigslist and our neighborhood community association. We were able to collect all the wood and much of the hardware like hinges and door handles. So far our biggest investment has been on screws and chicken wire. Here are some pictures from the two days over the winter holidays where we built the first two sides.


Our plans and reference books.

Katie and Abbey framing the first side.

Using reclaimed wood for the first side.

Ripping wood to the right size with a table saw from the tool lending library.

Team work power drilling!

Patrick trimming the bottom of the second side.


2.09.2013

Chickens! Part 1

We have been talking about our chickens for over a year now. Our future chickens that is. About this time in 2012 we decided what our urban farm needs is chickens. Having fresh eggs every morning is certainly the biggest appeal. But as we learned, there are lots of other positive aspects about home chicken raising including feeding them our food scraps and using their manure as compost. Plus they can be great pets.

So we started our research and are trying to learn as much as we can in preparation for our flock. Besides getting some books at the library that meant visiting friends who have chickens! We went to Alameda and learned how children can be very involved with chicken raising. Some Longfellow neighbors let us come ask a bunch of questions about their coops and chicken runs. We also went to visit a friend who lives in the Oakland Hills and built her coop underneath her porch.

We took care of the City Slicker Farms' chickens while they were on holiday. So we got first hand experience feeding, watering and collecting. There are over fifteen chickens at the Center Street farm (way more than we'll ever have in our yard) but it was pretty easy. Even though it was winter and egg production is generally slower, we even got close to a dozen eggs each time we visited. 


2.06.2013

Family Quilt

Patrick's great grandmother left behind a number of quilts. Over the past year and a half, we have worked to finish one we were given by Great Aunt Hazel. Ours is a scrap quilt made from many small scraps of fabric that was sewn in 1962. Every time I look at it, it seems I find another pattern. The quilt squares were sewn together but it did not have a back or batting nor was it quilted.

That's where the other side of the family comes in. My Aunt Roseann has her own quilting business, Cedar Creek Quilting. She has a ridiculously large long-arm quilting machine that can stitch a million designs on your quilt (well I don't know about a million but a lot!). Patrick and I chose a dogwood design because it fit with the southern roots of his maternal great-grandmother. We told Roseann we wanted the backing fabric to be blue and let her pick the pattern.


After the quilting and backing was finished, my parents picked up the quilt from Washington and drove it home on their summer vacation. Because Roseann knew I liked to sew, we decided Patrick and I would do the hand finishing of the binding. Because the quilt is queen-size, we invited some friends over to help. The Quilt Debate was born! A few friends came over for the Presidential Debate last fall and helped us sew over half the binding. Yay! for crafty friends! Pictured at right is David (not sewing), Katie, Marjorie, Patrick, Elizabeth and Anna.

The last piece of the project was created for us by Patrick's Aunt Debbie. She embroidered a really nice label for the back with all the details about Great-Grandma Florence. Four generations, two families and numerous friends  later we have a wonderful heirloom on our bed. It's beautiful and even more so for all the hard work and time spent on it. Thanks everyone!
 

1.16.2013

Bathroom Decorations at 667

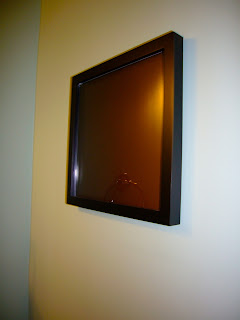
Downstairs half bath.
We needed more decorations around the house, but I didn't want to put up all the same art pieces that we've had at other places. So we are taking it slow to find the right items. I decided to make something myself out of the many fabrics in my craft collection.

Close up.

I wove different strips of blue fabrics with a little bit of color to make this for our downstairs bathroom.

Upstairs bathroom

Tina Dillman's Cookie Jar.

David's Between Katie and David; 2012; archival pigment print; 10x10 inches.

I had to stand in the shower to get them both in the photo.
David made me the photo for my birthday last month. The image appears very abstract, but it was based on a little bit of science. The very left edge of the photograph is the exact color of my eyes, the right edge perfectly matches the color of David's eyes and then there's the color spectrum we create between us. A similar Between Abbey and Patrick was made for Abbey. I thought it went well with our earth tone bathroom. Then I saw Tina's work on David's dresser just waiting for a good spot in our house & thought it was perfect. I realized while trying to take these photos that it is really difficult to photograph small bathroom spaces.

1.13.2013

Revisiting Summer

Seems like most people are experiencing pretty cold weather these days. It might even freeze tonight in Oakland. So looking through some pictures today, Patrick and I found this squirrel enjoying the fruits of summer. Here's looking forward to that Spring thaw!


Squirrels and insects probably ate more strawberries than we did this year!